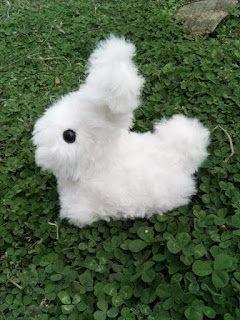
Crochet Tooth Fairy Pillow Pattern
My 7-year-old son has his first loose tooth. I wanted to make something for him. Most nights, he doesn't even sleep using a pillow, so it would be hard to leave his tooth under the pillow for the tooth fairy. He loves everything I crochet, so I decided to crochet something for him.
After spending hours searching the web and not finding what I really wanted, I decided to try to make something myself. I'd never crocheted anything without having a pattern to follow.

I hope my pattern is easy to understand.
Terms used:
Increase: 2 single crochet in one stitch
Sc: Single crochet
Sl St: Slip stitch
Materials:
- 5.00 mm(H) hook
- white acrylic yarn (mine was a medium 4)
- 12 mm safety eyes
- something to stuff the tooth with like Polyfil
- a needle to sew in the ends
First leg:
Chain 5
Row 1: Single crochet in the second chain from the hook then down the rest of the chain. Chain 1 and turn (4 sc)
Row 2: Increase across (8 sc)
Row 3 - 5: Single crochet across (8 sc)
Finish off with this leg. Cut yarn.
Second Leg:
Chain 5
Row 1: Single crochet in the second chain from the hook then down the rest of the chain. Chain 1 and turn (4 sc)
Row 2: Increase across. Chain 1 and turn (8 sc)
Row 3 - 5: Single crochet across. Chain 1 and turn (8 sc)
Do not finish off this leg. In row 6 we single crochet across and connect both legs.
Row 6: Single crochet across the leg, so you have 8 sc, chain 2, now we hold the first leg up and crochet across that leg connecting the two legs. (You should have 8 sc, ch 2, 8 sc) Chain 1 and turn
Row 7: Single crochet across both legs and the chain. Chain 1 and turn (18 sc)
Row 8-19: Single crochet across. Chain 1 and turn (18 sc)
Row 20: Single crochet across 7 stitches, slip stitch in 4 stitches, Single crochet in 7 stitches. (7 sc, 4 sl st, 7 sc)
Finish off. You should make this 2 times to have a front and back panel.
I added the eyes on Row 15. I counted over 6 stitches from the side and put the safety eyes in the 7th little hole on both sides leaving four stitches between the eyes.
Back Pouch:

Chain 11
Row 1: Single crochet in the second chain from the hook, then across the chain. Chain 1 and turn (10 sc)
Row 2-6: Single crochet across Chain 1 and turn(10 sc)
I finished off here. You could add a few more rows to make the little pouch bigger if you need or want.
I attached my pouch starting at row 9 going up to row 14. Sew it on around both sides and the bottom leaving the top open to create the pocket.
Holding both the front and back panel together attach your yarn to any corner and single crochet around the outer sides making sure to stuff as you go.


I hope my pattern was easy to understand. Please let me know if you need any help.
Kayla
Comments
Post a Comment